Not sure which fork goes where or what to do with all those plates? Want that picture perfect table set up that makes everything feel fancy? Here’s everything you need to know about how to set the table for Thanksgiving dinner.
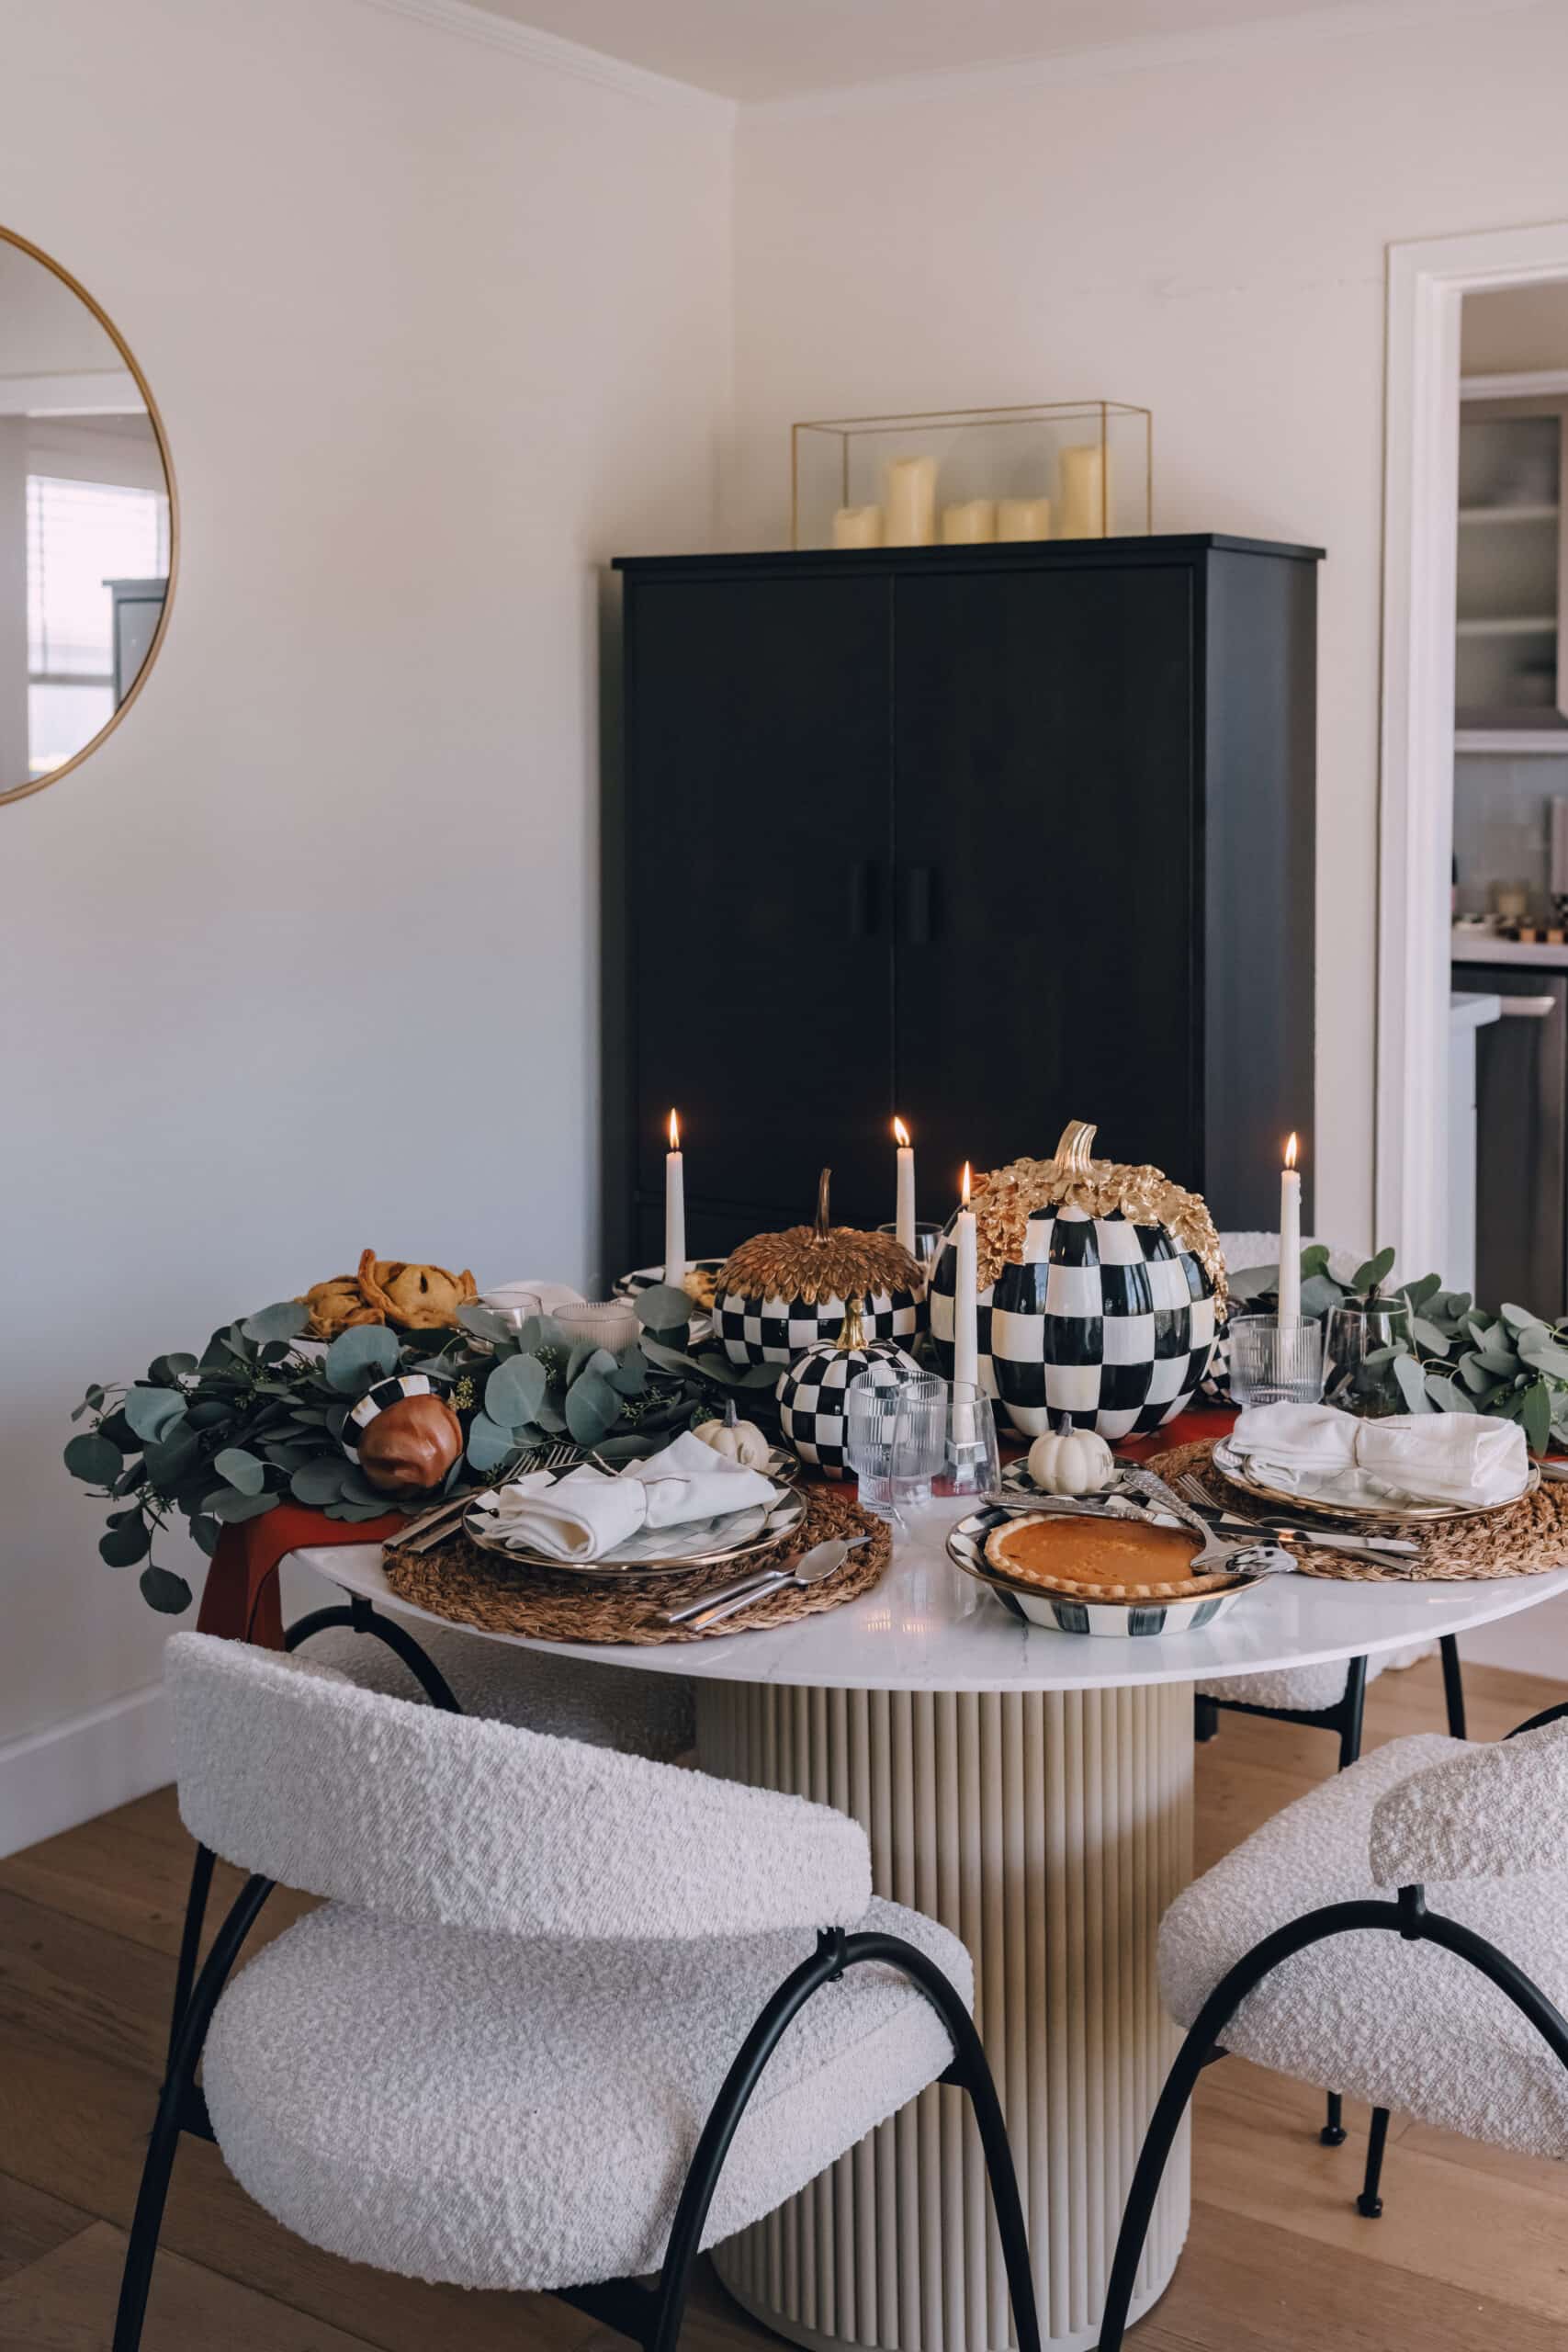

Fall is here, and that means that Thanksgiving is on the horizon. For a lot of people Thanksgiving is simply just another holiday, but for me, it’s my favorite holiday for two reasons. First, it kind of serves as the official kick off to the holiday season. (I’m a strict no tree before Thanksgiving girl.) But second, and more importantly, there’s something I find extra special about people you care about gathering around a table. Plus, nothing really brings people together quite like a great meal, and this is THE meal.
To anyone who knows me personally, Thanksgiving is my Olympics. I love a Thanksgiving checklist. I love the menu planning; making special dishes I only cook once a year; the challenge of timing everything perfectly; and setting up a beautiful Thanksgiving table.
And I know this can all be intimidating, so I’m here to help!
Here’s everything you need to know on how to set a beautiful table and the fundamentals of a formal place setting.
How to Set a Table for Thanksgiving
Check your Plates and Silverware
First, give your plates and silverware a quick check. Be sure you have enough place settings, water glasses, and wine glasses to cover whoever may be coming to Thanksgiving dinner.
If you’re going for a more formal table set up, you want to have at minimum, the following pieces per person:
- A placemat or a charger
- Dinner plate
- Salad plate
- Salad fork (the smaller one)
- Dinner fork (the larger one)
- Knife
- Soup spoon (the larger one)
- Napkin
- Napkin ring (optional, depending on how you fold the napkin)
- Water glass
- Wine glass, if serving wine
You can also include a bread plate, bread knife, and dessert spoon if you have them. However, for the sake of this blog post, other than the bread plate, these aren’t not included.
Choose a Color Palette
Choose a color palette to bring in some seasonal flare for your table. Warm tones like brown or rust always work this time of year, as does green or even navy.
Accent pieces like a table runner, tablecloth napkins, napkin rings, and even candles can all provide a season pop of color to your table.
If you’re looking to maximize use of your plates year after year, stick with white plates, then layer in color with accent pieces.
White plates always look chic, and they go with whatever color palette you may choose for your dining table. Plus, you can always mix your white plates with other patterns and prints over time.
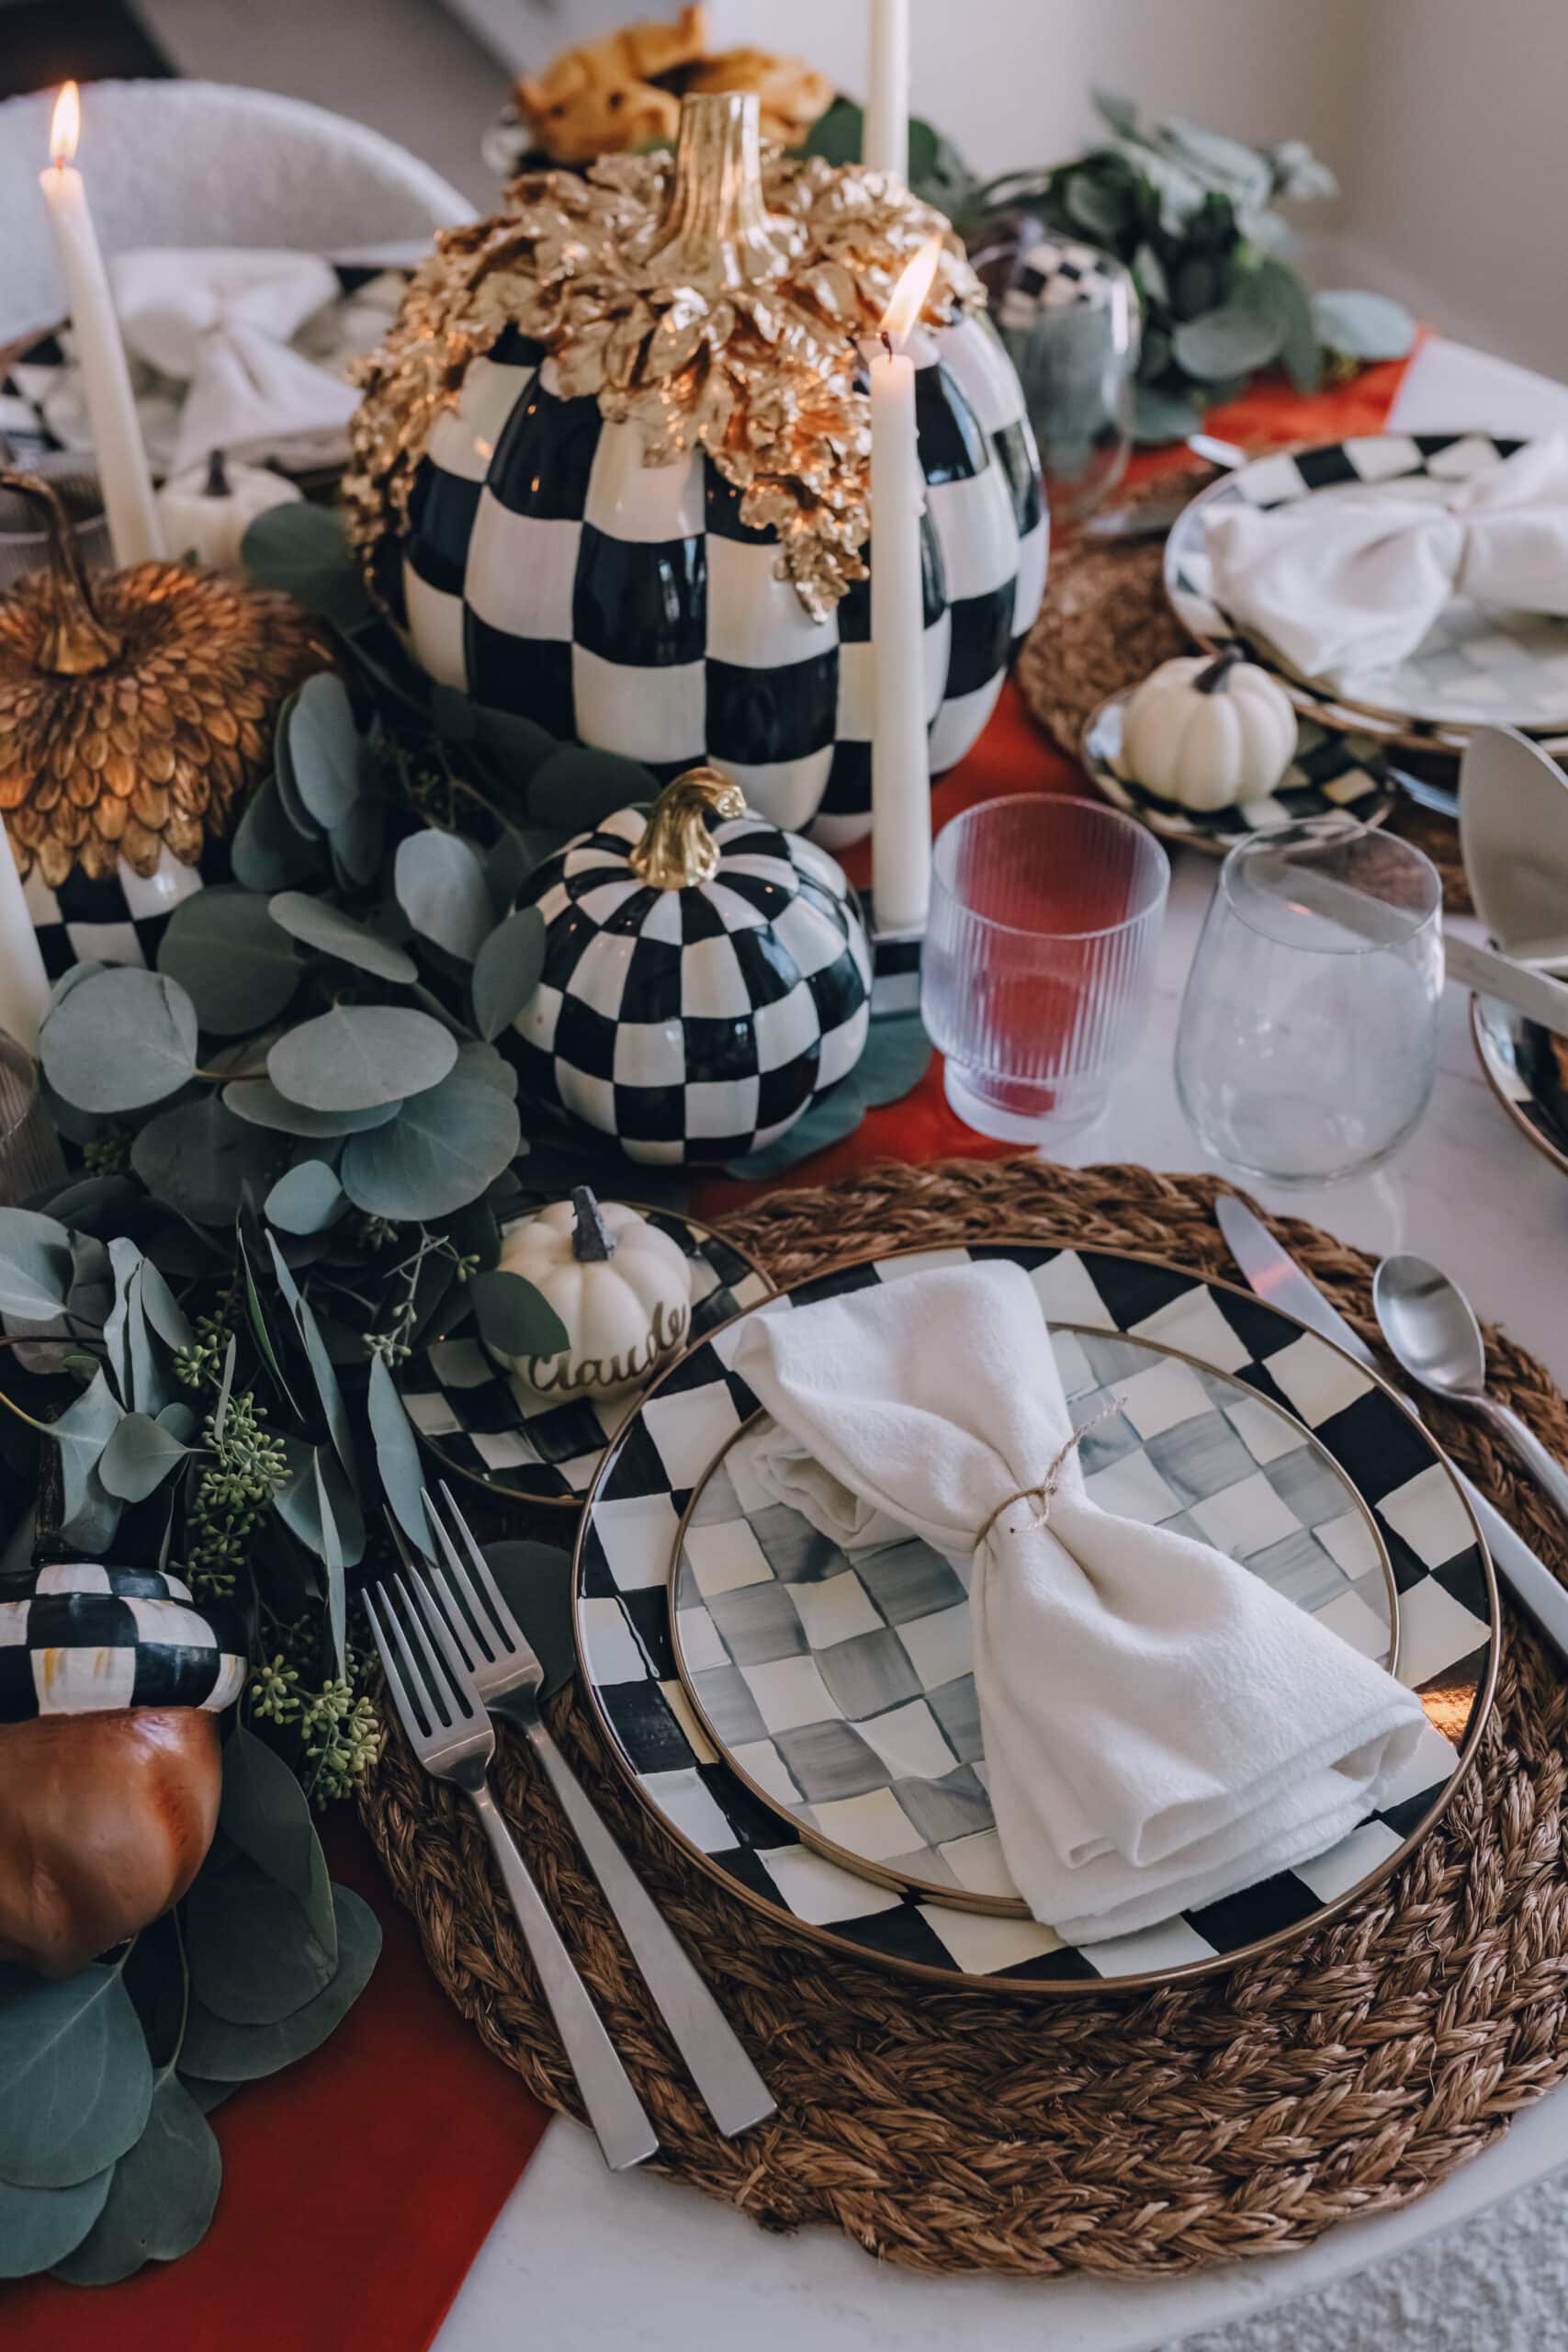
My favorite everyday plates that still feel fancy are these white plates from Crate & Barrel. You can also find my gray checkered plates here and my black checkered plates here.
Pick Your Centerpiece
Thanksgiving centerpieces don’t have to be difficult. In fact, there are a few affordable centerpiece items that I stick to every single year: greenery, candles, and some kind of seasonal produce like mini pumpkins or pears.
Garland is one of the easiest ways create a focal point and fill your table.
If you have a flower district in your area, many vendors around Thanksgiving likely make and sell garland to the public. I’ve also had luck finding garland at Trader Joe’s. Or, if you’re feeling crafty, try your hand at some DIY eucalyptus garland!
At the center of your table, try a floral arrangement, rows of candles, or real or decorative pumpkins. Here’s how to arrange grocery flowers like a professional florist.
Think in Layers
The key to a beautiful tablescape for any set up is to think in layers. This will make your table feel abundant and is true of your centerpiece décor items and place settings.
Start with a runner or tablecloth, then add in the next biggest décor element, and so on.
Set the Place Settings
Once you’ve got your table centerpiece done, it’s time to set the table! Here’s exactly what to do with all those plates, forks, and glasses:
How to Set a Formal Place Setting
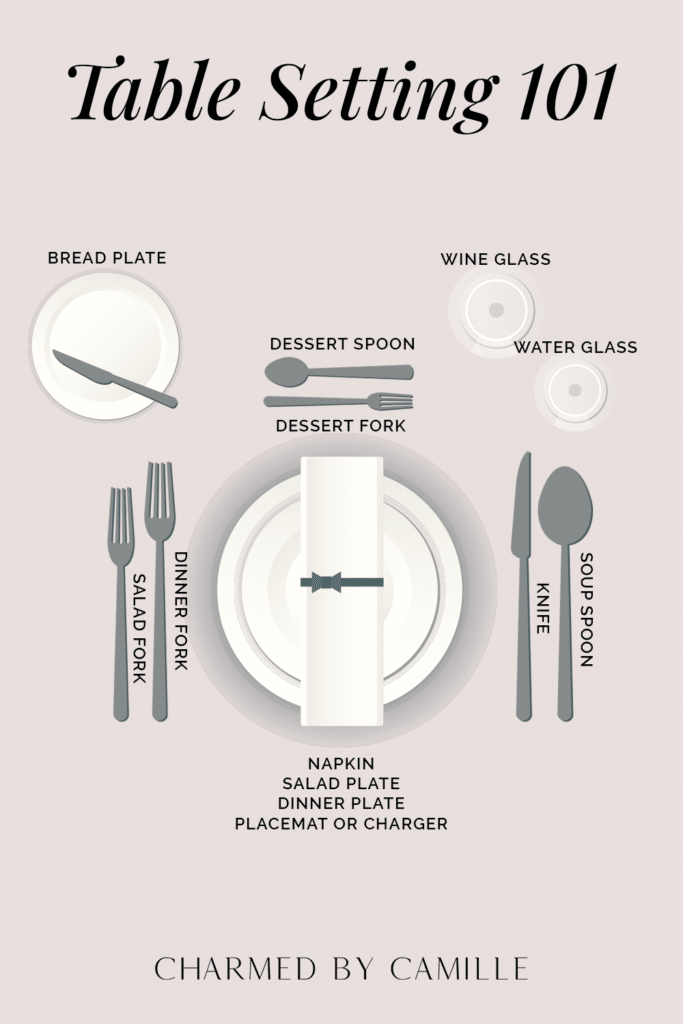
Step 1: The Base
Start with a placemat or a charger as the base layer to your place setting. A charger is an oversized decorative plate.
Step 2: Plates
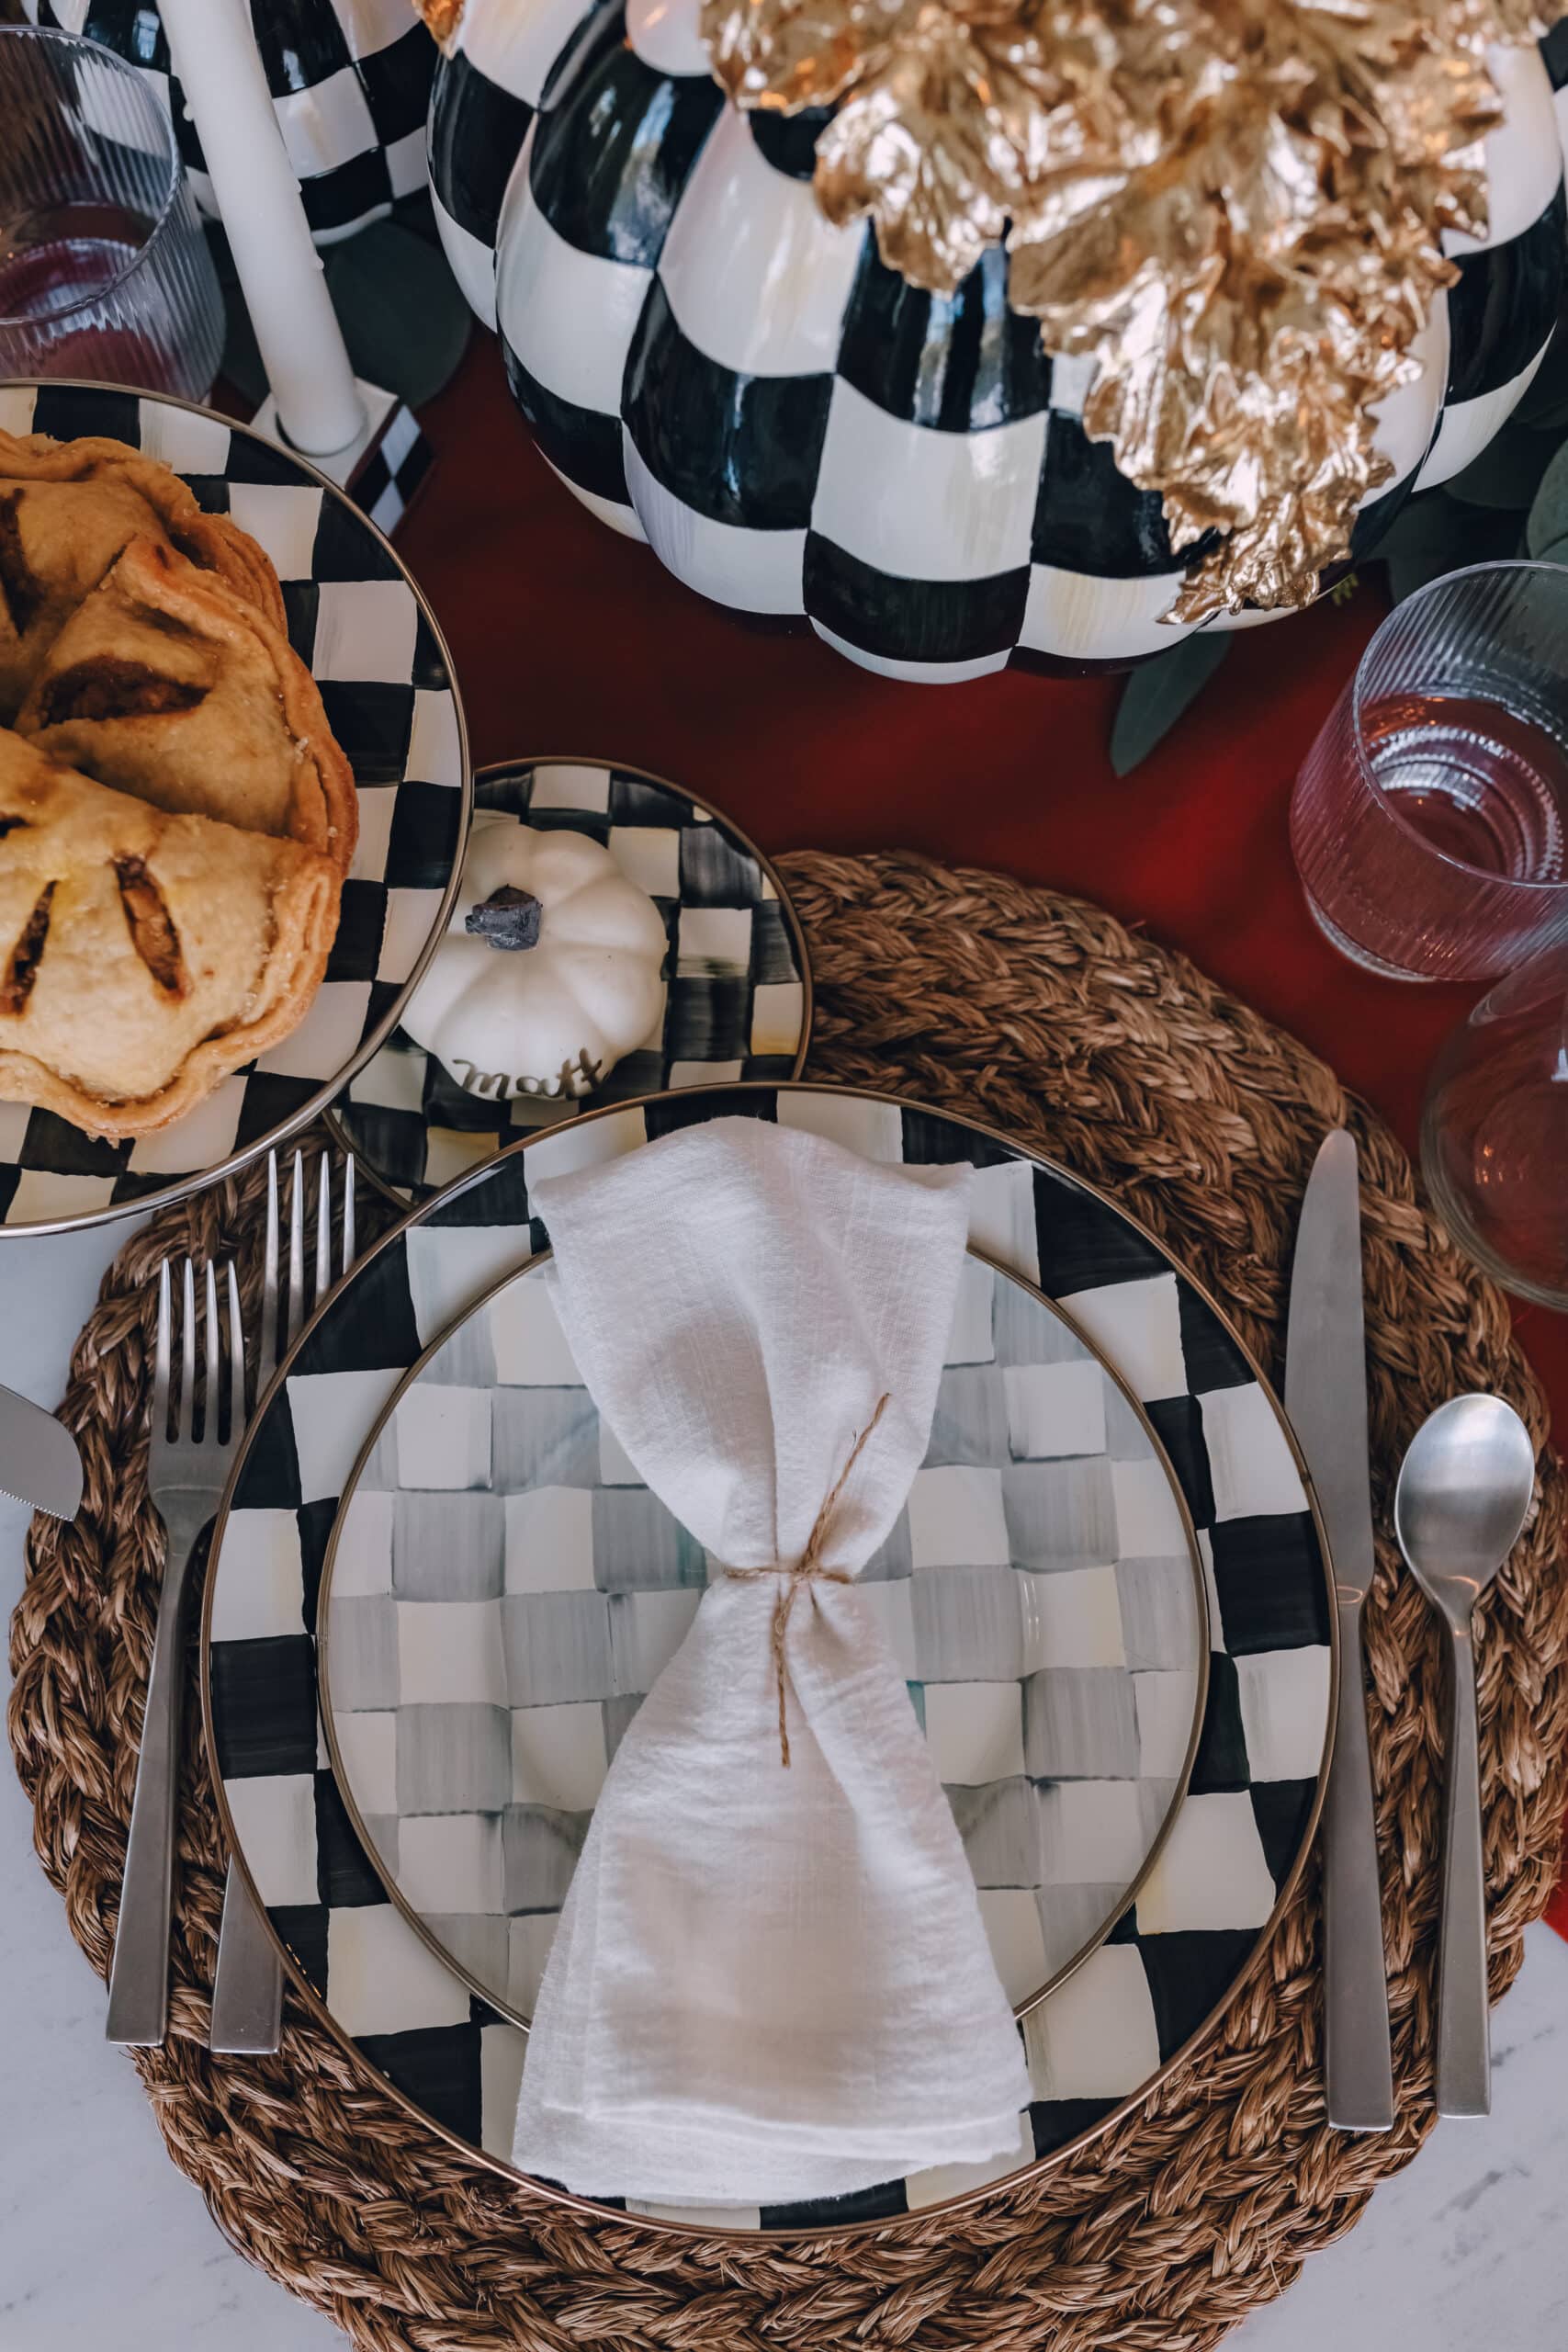
Place the large dinner plate on the mat or charger, then the smaller salad plate on top of it. If you have a small bread plate, this should go in the upper left hand corner of the place setting.

Step 3: Silverware Placement
Silverware placement is always what seems to throw people when setting a table.
Regardless of how many forks, spoons, and knives you have, you work from the outside in to your plate. The smallest utensils are the furthest from your plate, working up to the largest ones closest to your plate.
Forks go on the left. The knife and spoon go on the right. The knife goes closest to your plate with the blade pointing in.
If you do have a dessert spoon and fork, those should lay horizontally above your plates on the table.
Step 4: Glasses
When setting a table, glasses always go in the top right corner of the place setting.
If serving wine, place the wine glass at the top, then the water glass below it. I love these ribbed glasses and use them for everything from water to wine and cocktails.
Step 5: Napkins
Fold a cloth napkin and place it over the center plates. Cloth napkins are an easy, affordable way to instantly elevate your Thanksgiving table.
I also like to add a finishing touch to my Thanksgiving table, either with a printed menu or a name card. A menu makes things feel fancy, and name cards provide a personal component.
And there you have it; my exact process on how I set the table for Thanksgiving year after year. I hope this gives you the confidence and the knowledge to finally pull those extra forks and knives out of the drawer now that you know where everything goes! Cheers!
